Saturday, 30 January 2016

20 useful tar and zip commands


Introduction to File compression and archiving

20 useful tar and zip commands  It is useful to store a group of files in one file for easy backup, for transfer to another directory, or for transfer to another computer. It is also useful to compress large files; compressed files take up less disk space and download faster via the Internet.

It is important to understand the distinction between an archive file and a compressed file. An archive file is a collection of files and directories stored in one file. The archive file is not compressed — it uses the same amount of disk space as all the individual files and directories combined. A compressed file is a collection of files and directories that are stored in one file and stored in a way that uses less disk space than all the individual files and directories combined. If disk space is a concern, compress rarely-used files, or place all such files in a single archive file and compress it.

Note: tar file is not a compressed file, but compressed file is archived file

As we so many extensions to compress the files using tar command, as we take few examples in this article. All the extensions will work to compress the files and directories but there compression ratio is different compare to each other. Based extension compression ratio we can use different options.

1. gzip

2. bzip

3. zip

Syntax: tar <File Name.tar> <directory / file path>

1. Archiving files using tar command

Archiving is not an compression of files and directories it's an kind of group all the files and directories together in single file, instead of multiple files. After creating an archive file, we can't see size difference in between actual file system size and archive file.

Let's see an example below

[root@TechTutorial tar]# du -h *.txt   <<-- Files Size before creating an archive  44K     d.txt  44K     g.txt  44K     kumar.txt  44K     ravi.txt  44K     tech.txt  44K     test1.txt  44K     test2.txt  44K     test3.txt  44K     test4.txt  [root@TechTutorial tar]# tar -cvf ravi.tar *.txt   << to Create an Archive file command  d.txt  g.txt  kumar.txt  ravi.txt  tech.txt  test1.txt  test2.txt  test3.txt  test4.txt  [root@TechTutorial tar]# du -h ravi.tar  << -- After Creating an archive file size  380K    ravi.tar

explanation of tar command options

-c Create an archive file

-v verbose (display all files status to archive)

-f specifying the files

2. Extracting an archive file

In order to extract the archive file we have to use -x option along with tar command

[root@TechTutorial tar]# tar -xvf ravi.tar  d.txt  g.txt  kumar.txt  ravi.txt  tech.txt  test1.txt  test2.txt  test3.txt  test4.txt

3. Updating an archive file with newly created files

There is a requirement that, we have to update an archive file by adding only newly created files.  Adding only newly created files to archive will save us the lot of time.

Let's see an example as shown below, when we use -u option along with tar command it will update the tar file with newly created files

[root@TechTutorial tar]# touch Techtutorials.txt  [root@TechTutorial tar]# tar -uvf ravi.tar *.txt  Techtutorials.txt

4. List files from archive without extracting them

all the times we know need to extract an archive in order to see the archive content, if it is an large file its very difficult to extract and it takes lot of time to extract and required disk space as well to extract the files.

We have to use '-t' option to see all files which are there in archive file

[root@TechTutorial tar]# tar -tf ravi.tar  d.txt  g.txt  kumar.txt  ravi.txt  tech.txt  test1.txt  test2.txt  test3.txt  test4.txt  Techtutorials.txt

5. Extract single file from archive

This option is very handy whenever we have an large archive file, we need only single file from that archive to be restored. In order to restore an single file from archive we have to use wildcards

[root@TechTutorial tar]# rm -rf *.txt  <<-- Deleted all the Files from current location  [root@TechTutorial tar]# ls   << -- After Deletion we have below files  3  arkit10.doc  arkit1.doc  arkit2.doc  arkit3.doc  arkit5.doc  arkit6.doc  arkit7.doc  arkit8.doc  arkit9.doc  ravi.tar  [root@TechTutorial tar]# tar -xvf ravi.tar Techtutorials.txt   <<<-- Restored an single file from archive  Techtutorials.txt  [root@TechTutorial tar]# ls   <<-- After Restoration we have below files  3            arkit1.doc  arkit3.doc  arkit6.doc  arkit8.doc  ravi.tar  arkit10.doc  arkit2.doc  arkit5.doc  arkit7.doc  arkit9.doc  Techtutorials.txt

above is the example how we can restore a single from archive

6. Extract multiple files from archive (not all files)

As you see in 5th step we extracted single file from archive, in the same way we are going to extract an multiple files from archive (not all).

Note: in order to extract files from archive you have to know exact file names, you can use '-t' to see all the files in archive

[root@TechTutorial tar]# rm -rf Techtutorials.txt   <<-- To get clarity deleted previous presented files  [root@TechTutorial tar]# tar -xvf ravi.tar "Techtutorials.txt" "test1.txt"  test1.txt  Techtutorials.txt  [root@TechTutorial tar]# ls  3            arkit1.doc  arkit3.doc  arkit6.doc  arkit8.doc  ravi.tar           test1.txt  arkit10.doc  arkit2.doc  arkit5.doc  arkit7.doc  arkit9.doc  Techtutorials.txt  [root@TechTutorial tar]# rm -rf Techtutorials.txt test1.txt  [root@TechTutorial tar]# tar -xvf ravi.tar --wildcards *.txt  d.txt  g.txt  kumar.txt  ravi.txt  tech.txt  test1.txt  test2.txt  test3.txt  test4.txt  Techtutorials.txt    

Note:: As we deleting the previous files only for demonstration only, DO NOT DELETE FILES in your environment.

you can mention multiple file names and also we can use wildcard option to restore multiple files as shown above example

7. Compressing files in gzip

As of now we see how to archive an files (grouping files together in single file). After creating an archive we did not get an space saving benefit because archive will not compress an files, file size will not decrease. When we compress an files we save disk space. If we want to create 'gzip' file with extension '.gz' we have to use '-z' option along with 'tar' command.

Let's see an example

[root@TechTutorial tar]# tar -czvf tech.tar.gz *.txt  d.txt  g.txt  kumar.txt  ravi.txt  Techtutorials.txt  tech.txt  test1.txt  test2.txt  test3.txt  test4.txt  [root@TechTutorial tar]# ls  3            arkit2.doc  arkit6.doc  arkit9.doc  kumar.txt  tech.tar.gz        test1.txt  test4.txt  arkit10.doc  arkit3.doc  arkit7.doc  d.txt       ravi.tar   Techtutorials.txt  test2.txt  arkit1.doc   arkit5.doc  arkit8.doc  g.txt       ravi.txt   tech.txt           test3.txt  [root@TechTutorial tar]# du -h tech.tar.gz  4.0K    tech.tar.gz  [root@TechTutorial tar]# du -h *.txt  44K     d.txt  44K     g.txt  44K     kumar.txt  44K     ravi.txt  0       Techtutorials.txt  44K     tech.txt  44K     test1.txt  44K     test2.txt  44K     test3.txt  44K     test4.txt  [root@TechTutorial tar]#

As shown in above example, after compression of text files using '-z' we got an compression file size is 4KB actual file size 380KB

8. Compressing files using bzip

Its also same like 'gzip' only but compression ratio of '.bz2′ is more compare to '.gz' we are going to compress same files as we used in above example and see how much we will get the compressed file size, for 'bzip' we have to use '-j' option.

[root@TechTutorial tar]# tar -cjvf 1tech.tar.bz2 *.txt  d.txt  g.txt  kumar.txt  ravi.txt  Techtutorials.txt  tech.txt  test1.txt  test2.txt  test3.txt  test4.txt  [root@TechTutorial tar]# du -h 1tech.tar.bz2  4.0K    1tech.tar.bz2

In this comparison of '.gz' and '.bz2' compression methods practical examples are below

9. Compression ratio of .gz (gzip) and .bz2 (bzip)

After compressing 34MB using '.gz' output file size is 8.6MB.

Using same  files compressed with '.bz2' output file size is 7.2MB. Comparatively .bz2 compression ratio is higher than .gz

[root@TechTutorial tar]# du -h tarr.tar.gz  8.6M    tarr.tar.gz  [root@TechTutorial tar]# du -h tarr.tar.bz2  7.2M    tarr.tar.bz2

10. Extracting compressed files from 'gzip' and 'bzip'

To extract 'gzip' and 'bzip' files we have to use '-x' option along with there own options '-z' for gzip and '-j' for bzip.

Below is the example for extracting the 'bzip' file

[root@TechTutorial tar]# tar -xjvf 1tech.tar.bz2  d.txt  g.txt  kumar.txt  ravi.txt  Techtutorials.txt  tech.txt  test1.txt  test2.txt  test3.txt  test4.txt

Below is the practical example for extracting the 'gzip' file

[root@TechTutorial tar]# tar -xzvf tech.tar.gz  d.txt  g.txt  kumar.txt  ravi.txt  Techtutorials.txt  tech.txt  test1.txt  test2.txt  test3.txt  test4.txt  [root@TechTutorial tar]#

11. zipping the files using zip command

zip command is used to compress the files with .zip extension, zip is available in different platform's such as Unix, Linux, Windows and MAC.

Syntax:  zip <Destination File Path and Name>.zip  <source files to compress>

below is the example to compress the files using 'zip' command

[root@TechTutorial tar]# zip docfiles.zip *.txt    adding: d.txt (deflated 100%)    adding: g.txt (deflated 100%)    adding: kumar.txt (deflated 100%)    adding: ravi.txt (deflated 100%)    adding: Techtutorials.txt (stored 0%)    adding: tech.txt (deflated 100%)    adding: test1.txt (deflated 100%)    adding: test2.txt (deflated 100%)    adding: test3.txt (deflated 100%)    adding: test4.txt (deflated 100%)  [root@TechTutorial tar]#

12. zipping files and directories along with sub directories and its files

When we use remote directory compression using 'zip' command it will not compress all the sub directories and its content in order to compress all the sub directories and its files we have to use '-r' along with zip command

[root@TechTutorial tar]# zip -r subdir.zip ravi/    adding: ravi/ (stored 0%)    adding: ravi/kumar/ (stored 0%)    adding: ravi/kumar/tech/ (stored 0%)    adding: ravi/kumar/tech/d.txt (deflated 100%)    adding: ravi/kumar/tech/g.txt (deflated 100%)    adding: ravi/kumar/tech/kumar.txt (deflated 100%)    adding: ravi/kumar/tech/ravi.txt (deflated 100%)

13. compressing with high compression ratio

zip command has good feature that we can also mention an compression ratio option from 1 to 9. 9 gives high compression.

[root@TechTutorial tar]# zip -9 -r deepcompress.zip ravi/    adding: ravi/ (stored 0%)    adding: ravi/kumar/ (stored 0%)    adding: ravi/kumar/tech/ (stored 0%)    adding: ravi/kumar/tech/d.txt (deflated 100%)    adding: ravi/kumar/tech/g.txt (deflated 100%)    adding: ravi/kumar/tech/kumar.txt (deflated 100%)    adding: ravi/kumar/tech/ravi.txt (deflated 100%)    adding: ravi/kumar/tech/Techtutorials.txt (stored 0%)    adding: ravi/kumar/tech/tech.txt (deflated 100%)    adding: ravi/kumar/tech/test1.txt (deflated 100%)    adding: ravi/kumar/tech/test2.txt (deflated 100%)    adding: ravi/kumar/tech/test3.txt (deflated 100%)    adding: ravi/kumar/tech/test4.txt (deflated 100%)

14. Excluding particular file / directory from compression

We can also exclude file from compression in order to do that '-x' we have to use.

[root@TechTutorial tar]# zip -r compress1.zip ravi/ -x ravi/g.txt    adding: ravi/ (stored 0%)    adding: ravi/d.txt (deflated 100%)    adding: ravi/kumar.txt (deflated 100%)    adding: ravi/ravi.txt (deflated 100%)    adding: ravi/Techtutorials.txt (stored 0%)    adding: ravi/tech.txt (deflated 100%)    adding: ravi/test1.txt (deflated 100%)    adding: ravi/test2.txt (deflated 100%)    adding: ravi/test3.txt (deflated 100%)    adding: ravi/test4.txt (deflated 100%)  [root@TechTutorial tar]# ls ravi/  d.txt  g.txt  kumar.txt  ravi.txt  Techtutorials.txt  tech.txt  test1.txt  test2.txt  test3.txt  test4.txt

15. Delete particular file from zip

We can also delete an file from compressed file using option '-d' along with zip command

[root@TechTutorial tar]# zip -d compress1.zip ravi/tech.txt  deleting: ravi/tech.txt

16. Update newly created files to zip

We can update zip file using '-u' option which will only add newly created files to zip file.

[root@TechTutorial tar]# touch Update2.txt  [root@TechTutorial tar]# zip -u compress1.zip *.txt    adding: Update2.txt (stored 0%)  [root@TechTutorial tar]#

17. Update zip with newly modified files

Update only modifed files to zip file, in order to do modified file update use '-fr' option

[root@TechTutorial tar]# zip -fr compress1.zip *.txt  freshening: Update2.txt (stored 0%)  [root@TechTutorial tar]#

18. List all files from zip without extracting them

List all files from zip without extracting them

# less compress.zip

19. Check zip file content without extracting

Without extracting zip file, if you want to see zipped file content you can see using 'zmore' and 'zless' commands.

# zmore compress.zip  # zless comress.zip

20. De-compress zip file

In order to extract the zip file we have to use 'unzip' command. If files are exists it will ask you for the confirmation to re-write the same.

[root@TechTutorial tar]# unzip compress1.zip  Archive:  compress1.zip  replace d.txt? [y]es, [n]o, [A]ll, [N]one, [r]ename: y    inflating: d.txt  replace g.txt? [y]es, [n]o, [A]ll, [N]one, [r]ename: y    inflating: g.txt  replace kumar.txt? [y]es, [n]o, [A]ll, [N]one, [r]ename: A    inflating: kumar.txt

20 useful tar and zip commands 20 useful tar and zip commands 20 useful tar and zip commands 20 useful tar and zip commands 20 useful tar and zip commands

:: Conclusion ::

We can group all files and directories in a single file by archiving, We can also compress the files and directories in order to save the disk space. Archiving files and directories will not save a disk space.

Thanks for your precious time, please write your comments below ….

Generating Linux audit reports

Generating Linux audit reports

Generating Linux audit reports Audit reports are very crucial whenever we want to catch / track an incident and user activity on Linux machine. All the audit logs are going to save in /var/log/audit/ directory, when we see them directly we may understand them in correct way and in required fashion in order read all the logs and generate an beautiful reports using aureport utility allows you to generate summary and columnar reports on the events recorded in audit log files. Generating Linux audit reports

Summary report of all the activities
Executable files report
Terminal activity reports
Authentication report
Commands run report
Config change report
Crypto report
Remote Host name report
Integrity event report
Login report
Modification to accounts report
Mandatory Access Control (MAC) report
Pid report
Syscall report
Log time range report
Report about tty keystrokes
Virtualization report
AVC Audit Events – These are generated by the AVC subsystem as a result of access denials, or where specific events have requested an audit message (i.e. where an auditallow rule has been used in the policy).

1. Summary audit report of given range

To generate a report fro logged events in the fast 10 days excluding the current example day, use the following command as mentioned in below

[root@TechTutorial ~]# aureport --start 01/04/2016 00:00:00 --end 01/28/2016 00:00:00

Summary Report
======================
Range of time in logs: 01/08/2016 22:47:49.346 - 01/27/2016 17:30:01.670
Selected time for report: 01/04/2016 00:00:00 - 01/28/2016 00:00:00
Number of changes in configuration: 6942
Number of changes to accounts, groups, or roles: 18
Number of logins: 36
Number of failed logins: 14
Number of authentications: 111
Number of failed authentications: 17
Number of users: 4
Number of terminals: 12
Number of host names: 4
Number of executables: 14
Number of commands: 68
Number of files: 1
Number of AVC's: 1
Number of MAC events: 36
Number of failed syscalls: 0
Number of anomaly events: 1
Number of responses to anomaly events: 0
Number of crypto events: 745
Number of integrity events: 0
Number of virt events: 0
Number of keys: 0
Number of process IDs: 1866
Number of events: 17019
in above command range is starting from Jan/4th/2016 ends with Jan/28th/2016

2. Executable file events

To generate a report of all executable file events, use the below command as shown

[root@TechTutorial ~]# aureport -x

Executable Report
====================================
# date time exe term host auid event
====================================
1. 01/08/2016 22:47:49 /usr/lib/systemd/systemd ? ? -1 6
2. 01/08/2016 22:47:49 /usr/lib/systemd/systemd-update-utmp ? ? -1 7
3. 01/08/2016 22:47:49 /usr/lib/systemd/systemd ? ? -1 8
4. 01/08/2016 22:47:49 /usr/lib/systemd/systemd ? ? -1 9
5. 01/08/2016 22:47:49 /usr/lib/systemd/systemd ? ? -1 10
6. 01/08/2016 22:47:49 /usr/lib/systemd/systemd ? ? -1 11
7. 01/08/2016 22:47:49 /usr/lib/systemd/systemd ? ? -1 12
8. 01/08/2016 22:47:49 /usr/lib/systemd/systemd ? ? -1 13
9. 01/08/2016 22:47:50 /usr/lib/systemd/systemd ? ? -1 14
10. 01/08/2016 22:47:50 /usr/lib/systemd/systemd ? ? -1 15

3. Executable file events summary report

As we see in above 2 step we can get all the executable file events the same if you want to see in summarized format use below command

[root@TechTutorial ~]# aureport -x --summary

Executable Summary Report
=================================
total  file
=================================
6992  /usr/sbin/xtables-multi
4932  /usr/sbin/crond
3267  /usr/lib/systemd/systemd
1129  /usr/sbin/sshd
240  /usr/bin/kmod
165  /usr/libexec/gdm-session-worker
73  /usr/bin/su
65  /usr/lib/systemd/systemd-update-utmp
16  /usr/bin/passwd
10  /usr/sbin/useradd
9  /usr/bin/sudo
3  /usr/sbin/usermod
2  /usr/bin/crontab
2  /usr/sbin/groupadd

4. Failed User Summary Report

To generate a summary report of failed events for all users, use the following command

[root@TechTutorial ~]# aureport -u --failed --summary -i

Failed User Summary Report
===========================
total  auid
===========================
68  unset
25  rankam
3  root

5. Failed login attempts report per each system user

Generate a summary of all failed login attempts per each system user, use the below command as shown in example

[root@TechTutorial ~]# aureport --login --summary -i
Login Summary Report
============================
total  auid
============================
176  root
12  unset
6  ravi
2  aavi

6. Search all file access events for particular user

generate a report from an ausearch query that searches all file access events for user 0 (root), use the following command as shown below

[root@TechTutorial ~]# ausearch --start today --loginuid 0 --raw | aureport -f --summary

File Summary Report
===========================
total  file
===========================
<no events of interest were found>

7. Log time range report

In order to know your current log available range use following command

[root@TechTutorial ~]# aureport -t

Log Time Range Report
=====================
/var/log/audit/audit.log: 01/08/2016 22:47:49.346 - 01/28/2016 17:20:01.265

8. Modifications to accounts report

This below command will give us the report about modified user accounts

[root@TechTutorial ~]# aureport -m

Account Modifications Report
=================================================
# date time auid addr term exe acct success event
=================================================
1. 01/09/2016 17:31:20 0 ? pts/1 /usr/sbin/useradd ravi yes 570
2. 01/09/2016 17:31:20 0 ? pts/1 /usr/sbin/useradd ? yes 571
3. 01/09/2016 17:31:20 0 ? pts/1 /usr/sbin/useradd ? yes 572
4. 01/09/2016 17:31:28 0 ? pts/1 /usr/bin/passwd ravi yes 573
5. 01/09/2016 17:31:28 0 ? pts/1 /usr/bin/passwd ? yes 574
6. 01/13/2016 15:13:02 0 ? pts/0 /usr/sbin/groupadd ? yes 443
7. 01/13/2016 15:13:02 0 ? pts/0 /usr/sbin/groupadd ? yes 444
8. 01/13/2016 15:14:41 0 ? pts/0 /usr/sbin/useradd ? yes 445
9. 01/13/2016 15:14:41 0 ? pts/0 /usr/sbin/useradd ? yes 446
10. 01/14/2016 14:38:36 0 ? pts/0 /usr/sbin/useradd ? yes 536

9. Reports about process ID's

below report will gives you the date and time when the process has been run

[root@TechTutorial ~]# aureport --pid

Process ID Report
======================================
# date time pid exe syscall auid event
======================================
1. 01/08/2016 22:47:49 614 ? 0 -1 6513
2. 01/08/2016 22:47:49 1 /usr/lib/systemd/systemd 0 -1 6
3. 01/08/2016 22:47:49 638 /usr/lib/systemd/systemd-update-utmp 0 -1 7
4. 01/08/2016 22:47:49 1 /usr/lib/systemd/systemd 0 -1 8
5. 01/08/2016 22:47:49 1 /usr/lib/systemd/systemd 0 -1 9
6. 01/08/2016 22:47:49 1 /usr/lib/systemd/systemd 0 -1 10
7. 01/08/2016 22:47:49 1 /usr/lib/systemd/systemd 0 -1 11
8. 01/08/2016 22:47:49 1 /usr/lib/systemd/systemd 0 -1 12
9. 01/08/2016 22:47:49 1 /usr/lib/systemd/systemd 0 -1 13
10. 01/08/2016 22:47:50 1 /usr/lib/systemd/systemd 0 -1 14

10. Host report

[root@TechTutorial ~]# aureport -h |less

Host Report
===================================
# date time host syscall auid event
===================================
1. 01/08/2016 22:47:49 ? 0 -1 6
2. 01/08/2016 22:47:49 ? 0 -1 7
3. 01/08/2016 22:47:49 ? 0 -1 8
4. 01/08/2016 22:47:49 ? 0 -1 9
5. 01/08/2016 22:47:49 ? 0 -1 10
6. 01/08/2016 22:47:49 ? 0 -1 11
7. 01/08/2016 22:47:49 ? 0 -1 12
8. 01/08/2016 22:47:49 ? 0 -1 13
9. 01/08/2016 22:47:50 ? 0 -1 14
10. 01/08/2016 22:47:50 ? 0 -1 15

11. Reports about configuration changes

if you want to track your system wide configuration changes you can go ahead and generate below type of report

[root@TechTutorial ~]# aureport --config 

Config Change Report
===================================
# date time type auid success event
===================================
1. 01/08/2016 22:47:49 CONFIG_CHANGE -1 yes 5
2. 01/08/2016 23:05:02 NETFILTER_CFG -1 yes 35
3. 01/08/2016 23:05:02 NETFILTER_CFG -1 yes 36
4. 01/08/2016 23:05:02 NETFILTER_CFG -1 yes 37
5. 01/08/2016 23:05:02 NETFILTER_CFG -1 yes 38
6. 01/08/2016 23:05:02 NETFILTER_CFG -1 yes 40
7. 01/08/2016 23:05:02 NETFILTER_CFG -1 yes 41
8. 01/08/2016 23:05:02 NETFILTER_CFG -1 yes 42
9. 01/08/2016 23:05:02 NETFILTER_CFG -1 yes 43
10. 01/08/2016 23:05:02 NETFILTER_CFG -1 yes 44

12. Keystroke report

The audit.log file contains all keystrokes entered by the specified user, including backspaces, delete and return keys, the control key and others. Although the contents of audit.log are human-readable it might be easier to use the aureport utility, which provides a TTY report in a format which is easy to read. You can use the following command as root:

[root@TechTutorial ~]# aureport --tty

TTY Report
===============================================
# date time event auid term sess comm data
===============================================
<no events of interest were found>

We can generate lot many reports using this aureport command below are the options Generating Linux audit reports Generating Linux audit reports Generating 
Linux audit reports

       -a,–avc                       Avc report
       -au,–auth                     Authentication report
       –comm                         Commands run report
       -c,–config                     Config change report
       -cr,–crypto                   Crypto report
       -e,–event                     Event report
       -f,–file                       File name report
       –failed                       only failed events in report
       -h,–host                       Remote Host name report
       –help                         help
       -i,–interpret                 Interpretive mode
       -if,–input <Input File name>   use this file as input
       –input-logs                   Use the logs even if stdin is a pipe
       –integrity                     Integrity event report
       -l,–login                     Login report
       -k,–key                       Key report
       -m,–mods                       Modification to accounts report
       -ma,–mac                       Mandatory Access Control (MAC) report
       -n,–anomaly                   anomaly report
       -nc,–no-config                 Don't include config events
       –node <node name>             Only events from a specific node
       -p,–pid                       PID report
       -r,–response                   Response to anomaly report
       -s,–syscall                   Syscall report
       –success                       only success events in report
       –summary                       sorted totals for main object in report
       -t,–log                       Log time range report
       -te,–end [end date] [end time] ending date & time for reports
       -tm,–terminal                 Terminal name report
       -ts,–start [start date] [start time]   starting data & time for reports
       –tty                           Report about tty keystrokes
       -u,–user                       User name report
       -v,–version                   Version
       –virt                         Virtualization report
       -x,–executable                 executable name report
       If no report is given, the summary report will be displayed

Please provide your valuable feedback…

Sunday, 10 January 2016

Red Hat Enterprise Linux 7.2 Installation Guide


Red Hat Enterprise Linux 7.2 Installation Guide. RHEL 7.

Thursday, 8 October 2015

Power on Remote Server - Sending an magic packet

Power on Remote Server


As you think today’s technology, we are working from remote locations. Physical server will locate somewhere in thousands of miles long. If you think an emergency situations such as server is shutdown UN-unexpectedly it’s  may due to power issue, it’s may be due to cooling issue and so an.. in this situation you have to wait for the engineer who will come and switch on the server. If you think this server is serving the data for the production then..!! Don’t worry by doing below steps you can switch on your remote server without having the physical access to it.
By mistake, when you shutdown a system instead of rebooting, you can use Wake-on-LAN to power on the server remotely. Also, If you have a server that don’t need to be up and running 24×7, you can turn off and turn on the server remotely anytime you want.
We have to enable the Wake on LAN using magic packet settings in BIOS and NIC settings.

  • You can use Wakeonlan when a machine is connected to LAN, and you know the MAC address of that machine.
  • Your NIC should support wakeonlan feature, and it should be enabled before the
    shut down. In most cases, by default wakeonlan is enabled on the NIC.

BIOS Settings
Bios settings for wak on LAN
BIOS Settings WakeonLAN
In Windows Operating System
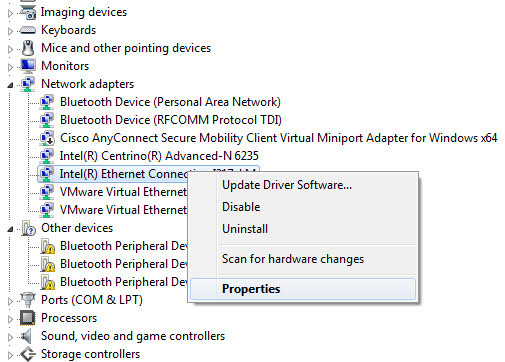
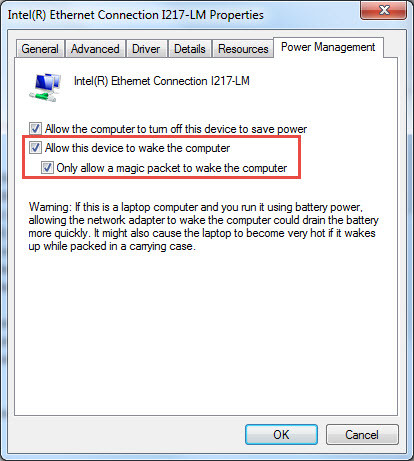
Go To. Start –> Computer –>Right Click –> Manage –> Device Manager –> Select Ethernet –> Right Click
Device Manager - NIC Settings
Device Manager – NIC Settings
Device Manager - NIC Properties
In MAC Operating System
MAC wakonLAN

In Linux Operating System
~$ sudo apt-get install ethtool 
~]# yum install wol*
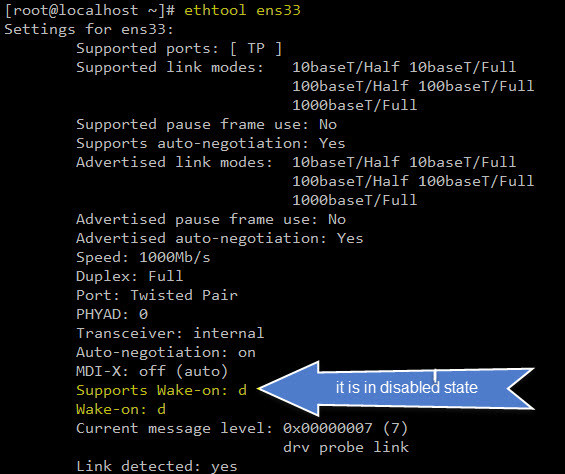
~]# ethtool ens33
Wake on LAN - Linux
option d = disabled
option g = enabled
# ethtool -s eth0 wol g
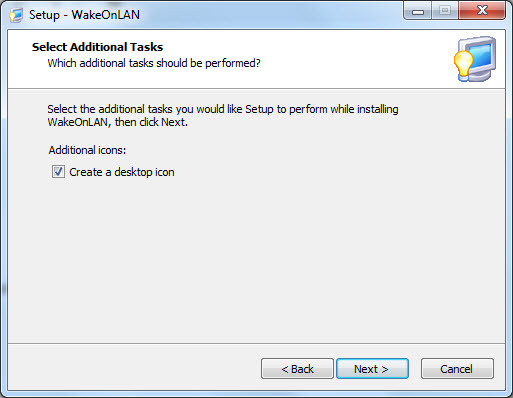
After all the above settings are done. Download and install application below application for windows OS.
Wakeonlan step 1Select Language and Click Ok
click Next
Click Next
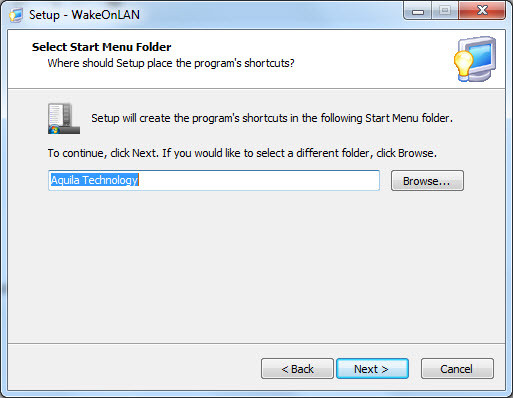
Wake on LAN - folder PathClick Next
Wake on LAN - NextClick Next
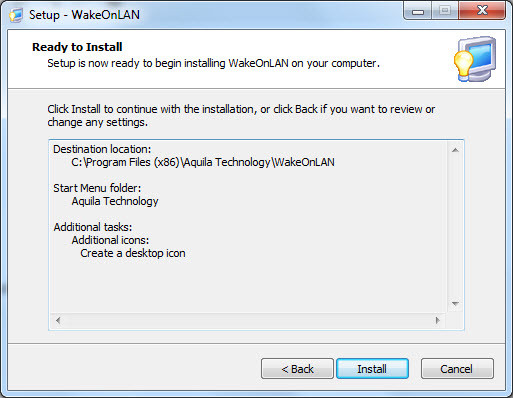
Wake on LAN - NextClick on Install
Wake on LAN - finish
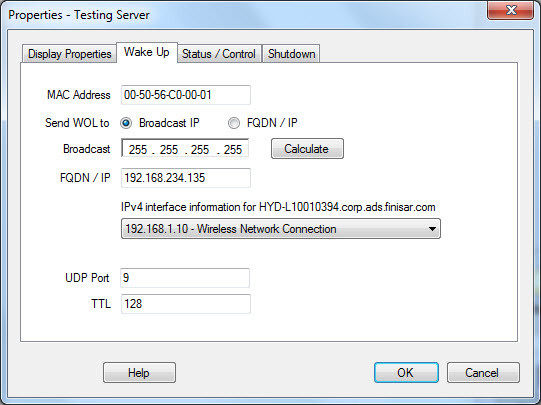
open application and File menu –> New Host
Wake on LAN MAc Address
Install wakeonlan package for ubuntu
$ apt-get install wakeonlan
$ wakeonlan 00:1f:d0:e8:c1:24
Sending magic packet to 255.255.255.255:9 with 00:1f:d0:e8:c1:24
using above command we can send and magic packet
Install wol package for RHEL / Centos / Fedora / Linux Mint
# yum install wol*
Please provide your valuable comments…

Restore System Default Permissions - Linux

Restore System Default Permissions - Linux


I recently came across a system which had some directories set to 777(recursively), the sysadmin needed to install an application and changed all the permissions a mess, I didn’t know where to start, i find one rpm has a parameter called --setperms and --setugids. most useful stuff when you face above situation.

I created a one liner that does the job, it takes time but It works. The same i want to share below is the one, to run this you have to have an sudo access either root access.

1) To reset uids and gids on files and directories :
~]# for u in $(rpm -qa); do rpm --setugids $u; done
2) To permissions on files and directories
~]# for p in $(rpm -qa); do rpm --setperms $p; done

Enjoy..!!

Wednesday, 23 September 2015

Take RDP of your ubuntu from windows machine – Ubuntu 14.04

xrdp24b

To take the Remote desktop of your ubuntu machine from windows machine using ‘mstsc’, we have an option to do that by installing the xrdp remote desktop protocol.

With the release of Ubuntu 14.04, the xRDP functionality has been improved but some small issues are still showing up. In this post, we will show you how to
  • Easily install xRDP
  • Connect to your Ubuntu Unity Desktop Interface
  • Set the keyboard layout to be used when using xRDP
Let’s go !

~]$ sudo apt-get install ubuntu-desktop

install ubuntu-desktop

 install xrdp using below command

~$ sudo apt-get install xrdp

install xrdp


add the user to access the ubuntu using the same user account
~]$sudo adduser arkit
 add user

Note: adding the user will not have a administrator access, in order to provide administrator access to created user account provide sudo access
~]$sudo adduser arkit sudo
provide admin access to user


start the xrdp service
~]$sudo /etc/init.d/xrdp start
 
Service start

now try to access from your windows machine
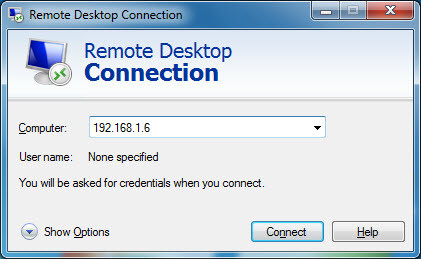
Start >> Run >> mstsc

Take_remote Desktop
type the IP address and click on connect
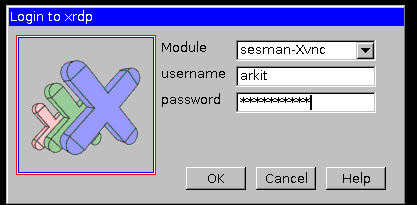
provide_username and password
provide the user name and password which you have created
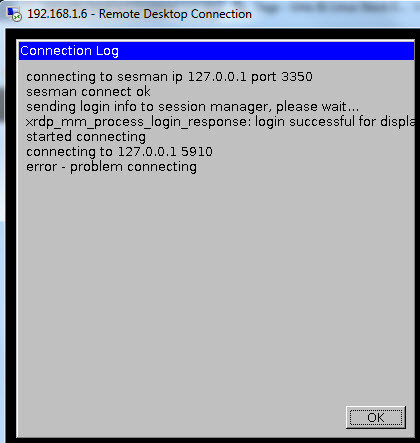
Note: if your getting an below error
error_xrdp
then do the below steps to resolve the issue
aravi@ankam-ubuntu:~$ sudo apt-get install gnome-session-fallback

aravi@ankam-ubuntu:~$ echo "gnome-session --session=gnome-fallback" > ~/.xsession aravi@ankam-ubuntu:~$ cat .xsession gnome-session --session=gnome-fallback
restart the xrdp service
~]$sudo /etc/init.d/xrdp restart

Still no Luck..!!

then try below
~]$ps -ef |grep vnc
~]$kill -9 <PID>

Now try you will get it..

Monday, 21 September 2015

Screen recording (video capturing) in RHEL7 using Krut


About Kurt

Krut has an intuitive and compact interface and boasts the following features
  • Timer-controlled recording
  • Movable recording areas during recording
  • Preview of ongoing recording
  • Optional mouse pointer recording
  • Record/Playback at 2 different frame rates
  • Highly accurate audio-video synchronization
As it is written in Java and is available as a runnable jar file, it is very easy to use on your Centos 7/RHEL7

Prerequisites to run Krut

Krut is required run java you have install java, jar and jdk.
GUI desktop have to be installed since it is a graphical user mode

Installation Procedure


~]#yum install java*
 
click on this link to Download Kurt

~]#unzip krut_full_0_9_4.zip
~]#cd Krut
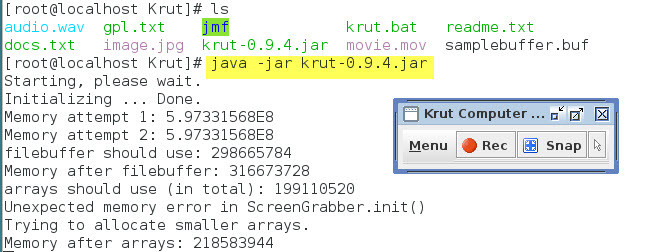
~]#java -jar krut.jar

Krut recorder - Tech Tutorials
Krut recording screen
click on record button to record the screen

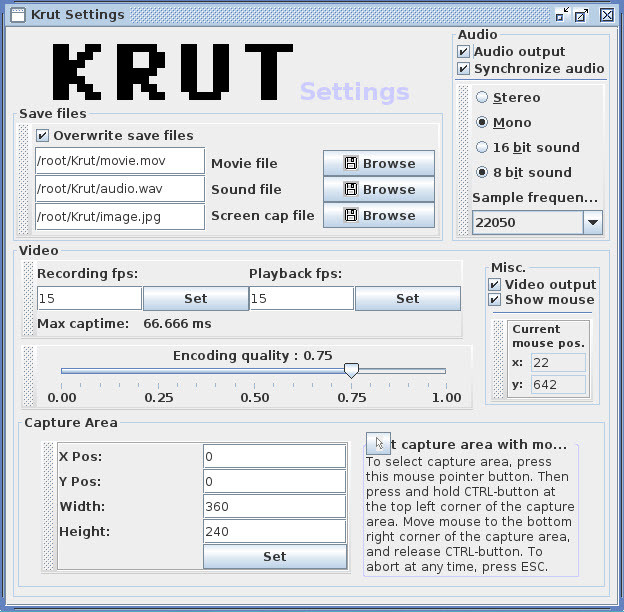
krut_settings
click on the Menu -> Settings

You can change the settings whatever you want.

Enjoy..!!

Please provide your valuable comments….


Monday, 14 September 2015

Convert time Seconds to Hours-Minutes-Seconds format - Shell Scripting

Using below script you can convert the seconds to Hours-Minutes-Seconds.

Writing loop _hms then converting the hours / 3600 because for hour 3600 seconds. Minutes can be converted using 3600/60 because it's equal to Minute.

#!/bin/bash
##Author: Ankam Ravi Kumar
##Date: 14th, SEP, 2015
##Convert seconds to Hours:Minutes:Seconds Format using this Script
##  START ##

[ -z ${1} ] && echo "Usage: $(basename $0) <seconds>" && exit||secs=${1}
_hms()
{
 local S=${1}
 ((h=S/3600))
 ((m=S%3600/60))
 ((s=S%60))
 printf "%dh:%dm:%ds\n" $h $m $s
}

_hms ${secs}
## END ##


Execution steps:
~]$ ./seconds.sh
Usage: convert.sh <seconds>

~]$ ./seconds.sh 456
1h:0m:0s

The same script also can be write as one line base line like below

$ secs=3600
$ printf ""%dh:%dm:%ds"\n" $(($secs/3600)) $(($secs%3600/60)) $(($secs%60))

1h:0m:0s

Same conversion we can write using awk as below

$ echo - | awk -v "S=3600" '{printf "%dh:%dm:%ds",S/(60*60),S%(60*60)/60,S%60}'

1h:0m:0s 

Video Tutorial


Print beautiful text banners - RHEL7 for freshers


To Print Text Banners in beautiful using a simple command.

This 'figlet' command required to install the figlet fonts to install the print follow the below process. 


Login to your Linux Server then run below command
~]# wget ftp://ftp.figlet.org/pub/figlet/program/unix/figlet-2.2.3.tar.gz

Download figlet

it will download an figlet package and save in current directory

Extra your figlet tar file using tar command
~]# tar -xzvf figlet-2.2.3.tar.gz

Now run to install the figlet
~]# make figlet 
Install figlet using make command

Now copy the .flf files to /usr/local/bin/ directory
~]#cd figlet-2.2.3
~]# cp * /usr/local/bin/
~]#figlet -k ravi


Please provide your valuable comments........